Monday, January 26, 2009

My Pillowcase Dress- DONE!


I am on a roll...how long will this last?? I guess with the cold weather and snow it made me motivated because I am now ready for spring!! I decided to start working on L's spring wardrobe and made her a pillowcase dress. I had added this to my "Future Projects" wish list and I am done!!! I LOVE IT!!! So cute I can't stand it!!


Procrastination Time: Zero! I am ahead of the game since it is 30 degrees outside and L won't be wearing this until the spring.

Pack-rat: The ribbon and bows are from my pack-rat ribbon collection

New: Pillowcase

Verdict: A little more time consuming then I thought but worth it! I did not follow the directions completely. The directions say to put 1 yard of ribbon through each side and tie it on the side. I put elastic all the way around and then put the bows on safety pins so I could take them off in the wash. So many variations to this project- so little time!

I really need to learn to make hair bows so the outfit is complete!

Saturday, January 24, 2009

1st Birthday Present - Tutu skirt

Today we went to a 1st Birthday party for our friend Katie. She is 9 days younger then my son, and I wanted to make something special for her. I made her a purple sparkly tutu skirt. Perfect for any Princess!! I've known what I wanted to make for over a month now, but I didn't make it until 2 days before the party! Hey, at least I did not wait 1 hour before the party!! (Done that before) I also bought Katie a matching bow (don't know how to make those but want to learn one day). I hope she like it!

I wish I had one of these when L was her age. The pictures I have seen with children in these skirts are just PRECIOUS!! I love them!

Of course we had to do a trial run and my 3 year old tried it on.

L loved it and asked me to make her one. So I did! (pictured is Katie's skirt) Can you believe I have already made L one? She is going to wear it to dance class this week. Now I am thinking of all the variations I can do...add ribbon, NC State colors, Spring colors, more birthday gifts...okay I am getting ahead of myself!!! One project at a time!

Procrastination Time: 1 month (not bad)

Cost: Secret it is a gift!!

Verdict: So fun to make. Loved this project and a great project to do in front of the TV! I will be making this again very soon!! Oh I can't wait until my sister has a baby (not that she is pregnant or even trying) BUT her girl (because she will have a girl) will be decked out in bows and lace!!

Monday, January 19, 2009

How to make Window and Door Draft Protectors

I live in the wonderful South, but right now I feel like I live in Iceland!! It is C-O-L-D!! It would be wonderful if it was cold and snowing, but NO it is just cold and dreary. YUCK! Today while the kids were asleep, and I couldn't get the chill off my bones, I decided to do something I have wanted to do since we moved into this home in January 2006 - make window and door draft protectors.

My house is not well insulated!! Thank you 1980 building supplies!

I decided to do a step-by-step this time so others out there, with drafty windows and door, can be inspired and make some! It really is SOOO easy!

Step 1: Gather your tools:

- scissors
- scrap material
- ruler
- pen (you know what that looks like!)
- sewing machine
- Reverser tool (don't know the technical name)
- kitty litter (not pictured)

Step 2: Cut your material 7" wide by the length of your door/window jam plus 3 inches. So if your door is 30 " wide you will cut a piece of material 7" X 33"

Step 3: With the right sides together match up length wise. Pin

Step 4: Sew around top edge and length with a 1/2" seam & Trim corners. (I had to attach two pieces together to make it the right length but since I matched up the pattern you couldn't tell!)

Step 5: Turn inside out with reverser tool and push out corners with the loop edge
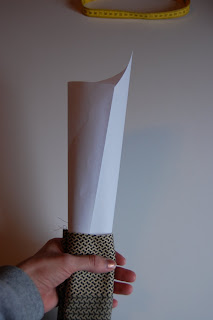

Step 6: Fill with cat litter. TIP: Roll a piece of paper inside and with the side that is not in the material have it expand. It will make a funnel! Use a cup to pour in kitty litter. DO NOT OVER FILL. You want a little room in the draft protector so you can mold it to the window/door jam.

Step 7: Fold over 2 times open edge. Hand sew or machine sew edge - I machine sewed with a zig-zag stitch

(in front of attic door in bedroom)

FINISHED!!

Procrastination Time: 3 years, time to make 10 minutes but I made 6 so 40 minutes.

Cost: The cost of kitty litter. No cats in this house to my daughter's dismay! I used scrap material that matched the colors in that room. ( I have lots of scrap material- I am a pack-rat) You could use socks or old jeans, but I prefer something that matches. They are selling these for $10-$20 a piece and I made it for less the 20 cents each!

Verdict: Love it and could tell an immediate difference! I bet my power bill will see a difference too! I am so stupid for not doing this sooner. I ended up make 3 for my room, 1 for the attic door in the hall, and 2 for the den windows.

Friday, January 16, 2009

Some things can't wait...

We love crafts in this home and this weeks project has been to make a page for a Blessing Book for Kristi. She is a mother of 3 boys who was diagnosed with stage 4 breast cancer with metastasis in the liver, spine and pelvis. Kristi is only 30 years old. You can read the whole story here. You can tell by her pictures she is a beautiful person inside and out. Her story is heart wrenching and we wanted to do anything we could do to help!!

I think one of the wonderful gifts of blogging is the kindest of strangers. I admit most times I am a friendly stalker and just browse lots of blogs. Then I find a blog that really strikes a chord, I put it in my favorites and check on them regularly. They seem to become my "friend" and they don't even know I exist. I found Kristi's story through this blog Kelly's Korner. She is an amazing Christian who is welcoming her baby girl, Harper, into the world today. To read her blog you immediately love her!! So when she posted about Kristi I knew we had to take action.

So this week we made this page for Kristi...

Thursday, January 15, 2009

Getting Back on Track- Morning Routine


by Leo Reynolds

I saw a post on Money Saving Mom which then led me to Biblical Womanhood Blog where she talks about procrastination!! I am not the only one!! Although my blog focuses of the procrastination of my projects, I promise you my procrastination creeps into most aspects of my life!! So I am going to take on her challenge and try to get back on track- I am motivated!!

My little W, was not the best sleeper (until he started drinking whole milk) and since I am the only one who hears him (JC could sleep through a hurricane!) I, by default use to wake up with him every night. So it was easy to sleep in until my daughter would wake me up. By that point it was 8am, I was slightly grumpy and some how the whole day would start off bad. One of my New Year Resolutions was to wake up before the kids and so far I am doing okay!

So here I am going to document my morning routine I am going to strive for...

6:15am- Wake up after my husband gives me sweet kisses
- I would like to say Work-out baby steps, baby steps so probably shower/ make-up bed
6:45am- Drink Hot Cocoa or water, pray and meditate
7:15am- Empty dishwasher, start making sippy cups (W is not very patient yet), and breakfast
7:45am- Greet my beautiful children for a fun filled day!!

Wednesday, January 14, 2009

Magnetic Frame

I put this post on how to make a magnetic frame in my favorites, back in November '08, with every expectation that I would make this for my NC State friends for Christmas. Well, look in my drawer you will see I still have another frame waiting to be made. I am not sure if I ran out of time, or I didn't think my friends would like my homemade gifts, that I lost interest in the project. Either way, I have the finished project!


(Me and JC in 2004 at a NC State Basketball game)

Procrastination Time: 2 months

Costs: 20 cents for felt, 50 cents for magnets, material scraps from other project, and cardboard from diaper boxes= 70 cents

Verdict: I liked this project. I made a door with additional cardboard in the back rather then a slit for the picture. I also used Mod Podge to protect the material. I don't think that was necessary. Very easy to do. Now that I see the finished product I think my Wolfpack friends would of liked this. Oh Well, there is always next Christmas. Besides, it looks so cute on the side of my refrigerator!

2 down lots more to go...

Saturday, January 10, 2009

Pillowcase Dress for Miss L


Okay, I know I said I wasn't going to start any new projects until I get some old ones done, BUT I saw the cutest dress in a boutique today that I HAVE to make for Miss L. (This is how I get in trouble!) It is seriously made out of a pillowcase and it is SUPER CUTE!! This is just an image I found from here with instruction on how to make it. I will make this, I will make this... In the boutique it had ribbon on the bottom and a matching bow. I will have to search the house to see what pillowcase I can steal from a bed (hehe).

So I am starting to also collect ideas and projects on the blog and hope to one day complete them and show everyone! Let's see how long it takes me!! If you have made one for your daughter, friend, or grand-daughter post your link in the comment section. I would love to see your designs.